A Win-Win-Win situation with Exploratory Testing
*Disclaimer* I have shared this post with Zalando and the bugs that I found have been put on a backlog for them…
Last Friday was a day I could spend on my own personal development. It’s been a while since I performed testing of any kind…. And with the 7th habit of Highly Effective People being to continuously sharpen the saw, I thought it might be useful to sharpen my exploratory testing skills. I just needed a website or a system to test. Having attended Melissa Eaden (MelTheTester)’s talk at TestBash Essentials Brighton 2019 about researching your competitors, I decided to look at Zalando. I also thought I may as well make it into a blog post, you know to sharpen my blogging skills as well! As Michael Scott would say… A Win-Win-Win situation…

Exploratory Testing….
Exploratory Testing has many definitions, depending of course on who you speak to. Some people liken it to trying to break the system (which isn’t what I would choose), this can be a bi-product of exploratory testing. I quite like this one (taken from Elisabeth Hendrickson’s slides on “Exploratory Testing in an Agile Context”
“ Simultaneously learning about the system while designing and executing tests, using feedback from the last test to inform the next.”
Like all good exploratory testing, I’m going to define a goal for the session and time-box it to 45 minutes. With this I hope to achieve some information about the website, as well as hopefully have some areas that I may wish to explore further in future sessions potentially. I may even find some bugs that I’ll raise with them….
The Set Up
I’m going to use Fiddler for this, as I like to keep an eye on any background calls that the website may be making, that aren’t entirely obvious in the front end. For those that don’t know, Fiddler is a tool that helps in debugging web applications as it captures the network traffic, it can allow you to modify requests and responses before the browser can receive them. There are many tools that allow you to do similar, such as Burp and Charles Proxy, but I’m more familiar with Fiddler, so will be using this. It also enables me to understand far more about the system, as it can give a glimpse into the inner workings of a website.
I’ll also be using a web browser, I’ve chosen Chrome, as it’s a standard web browser, my favourite web browser and one that I use on a daily basis! For me this exploratory session isn’t about exploring the browser or the tools I’m using, I want the focus to be purely on the website under test and so I have chosen tools that I am familiar with in order to get the value from the system under test.
I’m also going to be making notes as I go through the session, for that I’m just going to be using my super awesome RocketBook which allows me to store and categorise my notes in GoogleDrive and then wipe them clean with a wet cloth! As I make notes, I’ll be making a note of the time as well, this can be helpful if I ever had to go back through some event logs to see certain error codes, to save me trawling through a load of logs, I know what time to be looking for (not really applicable for this as I won’t have access to the logs but it would be useful if I did). I’ll then write these notes up here for you to examine and critique.
The Charter
Hopefully, you’ll know all about charters in relation to Exploratory Testing. If you don’t, have a look at the slides here. A charter for me is a mission statement, it answers the question “What am I trying to achieve”, it allows exploratory testing sessions to be focused whilst giving me the freedom to go off other tracks if I deem it necessary during the session.
For this session, my charter is:
I want to explore the Zalando product page
With Fiddler and Chrome
To discover and learn more about how the Zalando product page works
The actual charter for this session is quite broad, normally I would make it more focused on a new feature or whatever it is that I would like to test. For the purpose of this session, as I genuinely just want to learn more about Zalando, I’m keeping it fairly open ended to help with this.
And so we begin….
I close down all other applications that I may be running, so that means Slack, Skype, Skype for Business, Outlook etc. This is to ensure that I am focused on what I want to achieve, and do not get distracted.
I also like to listen to music, something that isn’t too distracting, a helpful tip is that the best music to listen to is generally video game music. It’s designed to not distract you from the game, but to merely add ambience. This for me is perfect for when I need to focus and concentrate. I love the Final Fantasy VII soundtrack, so this is what I’ve gone with, there’s a lovely piano version available here.
Open up the Chrome browser, and navigate to https://www.zalando.com/, I’m not that interested in how we get to the product page, so I’m just going to search and click on a product that takes my fancy. I searched for Jeans, and ended up on this product page:
Next, I open up Fiddler, or the web debugging tool of your choice, it’s important to keep an eye on it during the course of your testing session.

Firstly, Fiddler captures (by default) all the network traffic that is going on my machine. This can get very noisy, you’d be surprised at what network traffic is happening even when just sat idly. To remove all this noise I have change the All Processes selection in Fiddler to just the Web Browser (see above).
As soon as I open up Dev Tools in Chrome, I’m greeted with the following from Zalando, which I think is a nice touch:

It’s nice to see that they can have this in the source code, if you’re looking at our code, then chances are you might be an Engineer of some kind, so why not come work for us? ❤
Anyway, I refresh the page to see what traffic I can see, and also just to see what happens in the console, and there are some errors in the console, this is normal for me at least, I’m quite used to seeing errors in the console, that isn’t to say they might not be cause for concern. I make a note of what they are, and carry on (for now at least). Fiddler shows a tonne of calls being made, right now, there is too much for me to look through, so I decide not to explore too much these right now.
The most important aspect of a product page… Add To Bag
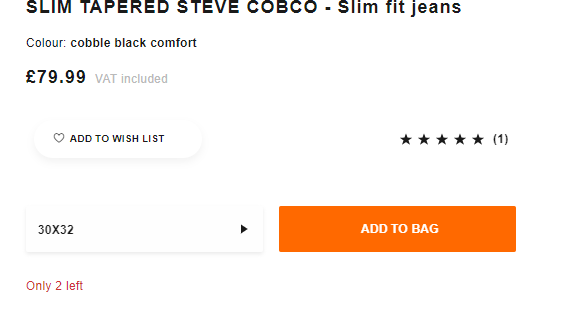
I already have some experience with how product pages work etc. The most important feature on the product page of an e-commerce site is to be able to “Add to Bag”. So I immediately jump in to the size selection.
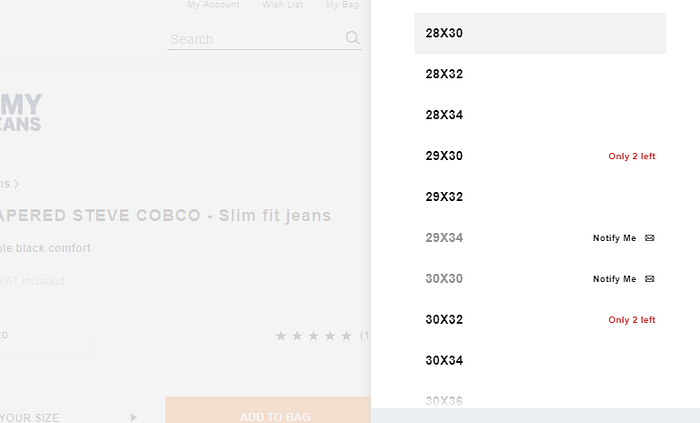
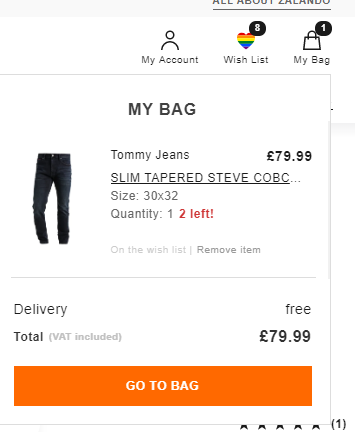
One of the things I really like here is that they show me what the amount of stock is left for each size, I do wonder what the threshold for this might be, so I’ve made a note to explore this further. I’m also interested in seeing how this functionality works, so I naturally select a size with only 2 left.
I add this to the bag, and refresh the page. My thinking here is, is the stock allocated when items are added to the bag, or when the user checks out? I open the size drop down again, half expecting to see “Only 1 left”, but for whatever reason, it stays as “Only 2 left”. This suggests to me that stock is allocated when the user checks out and completes the purchase. I then add another 1 to the bag. In theory, I now have all the stock of this item in my bag, but it’s still not been allocated to me, so I should be able to keep adding to the bag. So, I attempt to add a third piece of stock to the bag, and interestingly I get an error message in my Bag….
This is good, it means that people can’t add items to the bag that aren’t available or in other peoples bag, which means they won’t be disappointed come checkout if items are out of stock. It does beg the question about the Size/Option drop down, and I wonder if it’s cached at all? Probably something to investigate further when/if time allows.
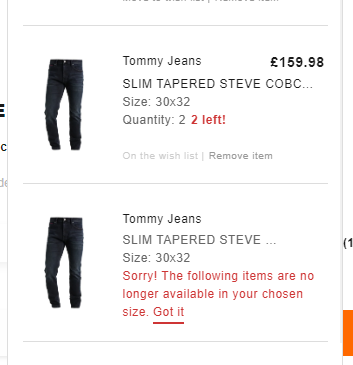
Interestingly, if I open up Incognito I can still add those items to the bag. Which again supports my theory that stock isn’t allocated in the back-end. Going back to my original window, and closing down the incognito session, i notice my bag showing 2 items in it. I have 2 pairs of the same jeans, and an error message in my bag. I see there is a link saying “Got It” in the error message, expecting it to remove the error message, but it actually removes all the items in my bag.
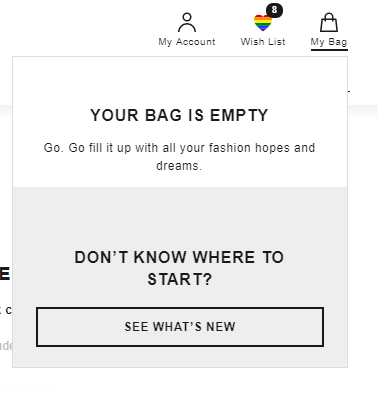
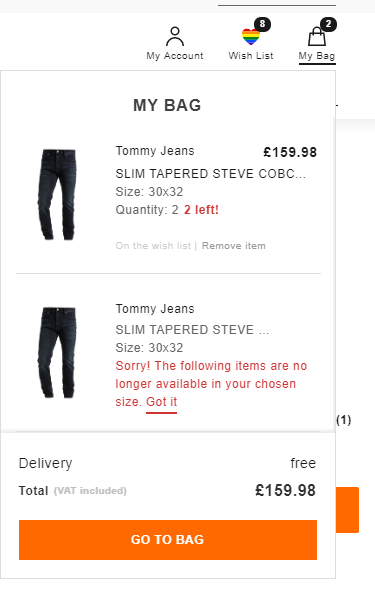
Meaning I have to add those 2 items to my bag again. I’ve found, in my opinion, my first bug!
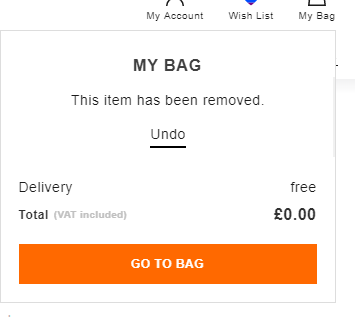
Once clicking the option, there is an option to “Undo” which is good, because it’s just got rid of all the items in my bag… In an ideal world it would add both items back in my bag, but unfortunately it only adds 1 of the product back, meaning if I originally wanted 2, I have to select it again.
I like the look of that, let’s save it for pay day…. The Wish List functionality
Next I want to look at “Add to Wish List”. Using “Comparable Products” as part of the HICCUPS heuristic, I imagine that it is similar to “Save for Later” on ASOS.com or the Wish list on Amazon.
Upon clicking Add to Wish List, for this I realise that I need an account in order to use this functionality. This is different to how ASOS operate, they allow “Guest” wish Lists, which works nicely, as once the customer has browsed and hopefully saved for later, they can then create an account. In my opinion it just makes it more seamless, but then I’m no expert….
I’m presented with a registration screen, which is cool, I could spend hours exploring this functionality, but seeing as it is just an enabler for me to use functionality on the Product Page, I decide to fill it in relatively quickly and just create an account using my standard email address.
Once I’ve created my account the item is added to my Wish List. I wonder if in order to keep the experience the same, they could show the item in the Wish List, in the same way they do a “Mini Bag”. Maybe that’s something that could be fed into the UX team.
I don’t know what clothes will go with these jeans…. The Complete The Look
Scrolling further down the page I get to the “Complete The Look” (CTL) section, I like this… a lot. I like how they show complete outfits with the Jeans that I’m interested in purchasing, in the hope that I might pick up some of the tops or trainers that I’m being shown. ❤
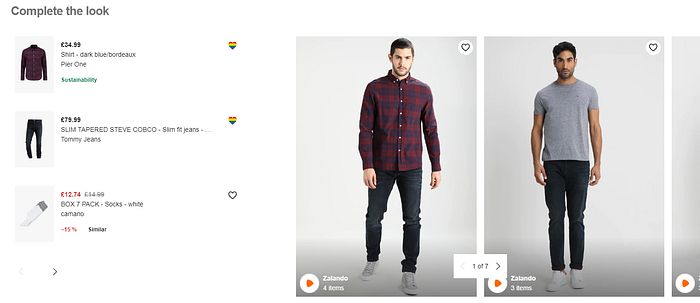
I select the top 2 items in the CTL, and add them to my Wish List. I also ❤ how they hearts are rainbow! 🌈I also like how I can add an entire look to my Wish List! It’s all about smoothing the e-commerce experience!
One thing that Zalando might want to think about is adding items with Size/Colour to your Wish List, so you can keep track of items that are “low in stock” possibly?
If I scroll further down the page, you reach “Similar Items”, here there are items that look similar to the product you are viewing. I wonder if they do Image Recognition here, or if there’s other logic behind it?
Anyway, it has a carousel similar to the CTL, the only thing here is that the arrow behaves differently to that of the CTL arrow. The CTL arrow moves items one at a time, whilst this one moves all the items across at once. This is possibly down to the number of items in the carousel, but would be interested to know if this is intentional. In my experience, the UX should be the same across the page when interacting with buttons and the like.
I want to know more…. The Newsletter Signup
Further down, I see a Newsletter Signup…. This is what I like to see! An E-Mail box, my mind immediately starts thinking about some classic e-mail test cases… things like “__@a.com” or “abc@a.co.uk” I start playing about, and notice in Fiddler a request being made to :

This is (I assume) sending the email details to the relevant service to subscribe me to the newsletter, sure enough if I select that request in fiddler and inspect the body, I can see:

If I enter invalid emails, I see no request being made, which is good. You wouldn’t want to be sending invalid emails to the service. This got me thinking, one of the things I like about Fiddler is the ability to capture requests before they leave my machine and go off into the world wide web. Before I do this, I need to set a break point on this specific request. Rather than setting a break point on every request, as that could get time consuming, I can edit the rules to only break on certain URLs. To do this I select Rules, then Customize Rules…

This opens up a text editor, and it’s from here I can create some rules around what requests I want to alter, or break on. In the commented section for “OnBeforeFunction” there’s a handy example as follows:

I already know that the newsletter request contains “/api/newsletter-banner-fragment/subscribe-customer request” so I then change the code to be:

Once I’ve changed this code, Fiddler will now pause before sending this request to Zalando, so that I can edit the body of the request. Sure enough, I refresh the page and enter an email address into the newsletter signup, and then can edit the body. I can change the request to be an invalid email for example, and then send the request. (I can set this automatically in code, but for ease of use, and the fact that I’ll want to explore in multiple ways, I leave this to be manual for now).
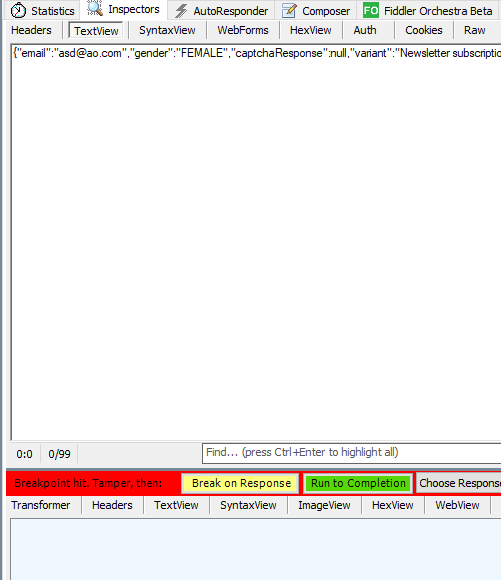
I edit the email, and then select “Run to Completion”. Sure enough, it goes through and I get a 200 response, with some handy JSON back from the API telling me that it all went through. The web page has also updated and said I’ve been signed up to the newsletter with the edited email address.
Now, what the response should be, is open to interpretation. Perhaps a 422 response, which collates to an “Unprocessable Entity” meaning the data is there, but it’s just not valid data? But then I am not an expert in HTTP Status Codes. It would also be interesting to know what happens to those invalid emails, do they get stored, and then subsequently is there an attempt to send an email to those email addresses? Or do they not get stored, but to the webpage we don’t see that, as it’s not really a “valid” use-case as the validation is happening at server side? If I had more time, and access to a test environment, I would try and delve further here, as it would be interesting to see how the underlying services are handling this data mismatch.
My Takeaways
And with that, my exploratory testing session has come to an end. To summarise, I’ve found some things I really liked about the Zalando website, things that to me didn’t necessarily make sense, some areas that I’d love to explore more and 2, possibly 3 “bugs” based on HICCUPS heuristics.
The bugs I found were:
- The stock values in the size/option drop-down don’t get updated when adding to bag, which is a bit confusing.
- The “Got It” message on the Mini Bag removes all the items from the bag, when I feel they shouldn’t remove any items from the bag.
- The subsequent “Undo” option after selecting “Got It” only adds 1 item back into the bag, regardless if I had 2 of that item in there.
The things I ❤ are:
- The rainbow 🌈 for the “Wish List” once I’ve added it to my Wish List.
- The ability to see the product being worn in a number of different outfits. As someone who struggles to find clothes that match, this is a really nice feature. 👌
- The message in the source code telling people to apply to work there
Things I wasn’t so keen on are:
- The carousel behaving differently for Complete The Look and Similar Items. From a UX perspective, I believe they should behave similar when scrolling through them. ▶️
- The fact I need to create an account to add to my Wish List. I personally feel that guests should be able to create Wish Lists, and then either merge when they sign in, or saved when creating a new account.
- For the newsletter, even after signing up and refreshing the page, the fact that the newsletter sign up persists probably isn’t the greatest experience. I’d like to think this could be hidden once the user has signed up to the newsletter. 📰
Areas that I’d love to explore more in a controlled environment are:
- The rest of the product page — I feel there’s a whole load of functionality that I didn’t test on the product page, so definitely more time to learn about the other elements of the page would be amazing.
- Where do the size/stock values come from? I spent far too long looking in Fiddler, I could see a request being made with the values, but I couldn’t see any response that set the values! I’d love to find this out as it was just frustrating not knowing!
- The newsletter sign up, there are many ways I could investigate this both from a security perspective and from just entering invalid emails, and seeing how it behaves.
So there we have it, a 45 minutes exploratory testing session on the Zalando product page. I did make notes using my Rocketbook, and have written them up here, but my notes aren’t anything amazing, but they’re available here should you wish to look at them…
One cool thing I learnt about Chrome was that it has “Pretty Print Minified JS File” option! So any JS files that are minified, when viewing them in Chrome Dev Tools, you can select to pretty print them which effectively “un-minifies” them and makes them readable… Definitely a handy feature if you didn’t already know about it.

It was really good fun getting back into things and doing some exploratory testing, and if I look back at my reasons behind doing this, I definitely think I came out of it with 3 W’s (Win-Win-Win). It was a bit scary at first, as I’ll be honest, I’ve not done anything like this for a while, but it’s definitely something I’m going to be doing on a more regular basis. I loved seeing how Zalando do things, I enjoyed using Fiddler and I loved using Chrome Dev tools! I think based on me finding out about the “Pretty Printing” of files, I’m going to look at exploring Chrome Dev Tools a little more as it’s been a long time since I used it in anger!
I hope you enjoyed reading, if you have any questions, then don’t hesitate to get in touch with me on Twitter!